Please Note: This article is written for users of the following Microsoft Word versions: 2007, 2010, and 2013. If you are using an earlier version (Word 2003 or earlier), this tip may not work for you. For a version of this tip written specifically for earlier versions of Word, click here: Selecting a Graphic Behind a Text Box.
You can overlay graphics and text boxes in a document. This can lead to problems in easily selecting objects, however. For instance, if you place a graphic in your document and then place a text box over the top of it, the graphic is essentially "hidden" by the text box, even if you can see the graphic through the text box. You then cannot directly click on the graphic to select it.
There are several things you can do to select the "hidden" graphic. The answers depend, in part, on how the graphic was inserted in your document.
The first way to select the graphic is to simply select the text box and send it behind the graphic. Right-click the text box, then use the tool that is best for what you want to do: Order, Bring to Front, or Send to Back. You can then click on the graphic to select it. When you are done, again right-click on the text box, and use the same tools to adjust the position of the graphic relative to the text.
If the graphic is floating over the text, not inline, and it is markedly smaller than the text box that obscures it, you can display the Home tab of the ribbon, click Select in the Editing group, and then choose Select Objects. Word displays the Select Objects arrow; click the mouse somewhere outside the bounds of the text box. Hold down the mouse button as you drag to "surround" the graphic, but without surrounding the text box. When you let go of the mouse button, the graphic should be selected.
Another way to select the obscured graphic (if it is floating over the text) is to use the Tab or Ctrl+Tab keys. If you have an object selected—such as the text box—and you press either of these keys, then the next object in the document is selected. If the text box and the graphic are the only objects, then the keys cycle between the two.
You should note that the Tab or Ctrl+Tab method will only work if you start with the text box selected. If the insertion point is visible in the text box, then the text box itself is not selected. To select the text box, you need to click the border of the text box, and the insertion point disappears. If you press Tab or Ctrl+Tab while the insertion point is visible in the text box, then you only modify the text in the text box; you don't select the next object.
WordTips is your source for cost-effective Microsoft Word training. (Microsoft Word is the most popular word processing software in the world.) This tip (13310) applies to Microsoft Word 2007, 2010, and 2013. You can find a version of this tip for the older menu interface of Word here: Selecting a Graphic Behind a Text Box.

Create Custom Apps with VBA! Discover how to extend the capabilities of Office 2013 (Word, Excel, PowerPoint, Outlook, and Access) with VBA programming, using it for writing macros, automating Office applications, and creating custom applications. Check out Mastering VBA for Office 2013 today!
Word allows you to add watermarks to your documents. If you inherit a document that includes a watermark, you may be at a ...
Discover MorePut numeric information in a table and you can then convert that information to a graphical chart using Microsoft Graph ...
Discover MoreWhen you insert an object into your document, it is anchored to a paragraph. If you want to change the paragraph to which ...
Discover MoreFREE SERVICE: Get tips like this every week in WordTips, a free productivity newsletter. Enter your address and click "Subscribe."
2024-04-01 09:37:17
Paul Stregevsky
Another way: Open the Graphics Selection pane, then select the graphic in the pane, and, in the context menu, move it to the front:
1. Open the Selection Pane. (see Figure 1 below)
2. In the pane, find the hidden graphic, and then select its name (for example, Picture 658). (see Figure 2 below) so the graphic will be "selected."
3. In the Picture ribbon, select Bring Forward. (see Figure 3 below)
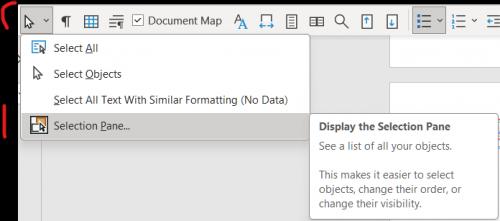
Figure 1. 1. Open the Selection Pane, shown here added to Quick Access Toolbar.
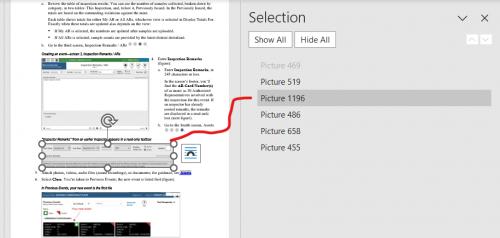
Figure 2. 2. In the pane, select the picture name so the picture looks selected.
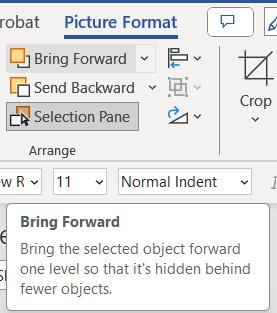
Figure 3. 3. In the Picture ribbon, select Bring Forward.
2024-03-29 04:41:50
Kiwerry
Unfortunately, Ken's tip about using the Select Browse button is no longer valid; I couldn't found the button in my Word 365, so I googled: MS removed it, and it last appeared in Word 2010 (https://answers.microsoft.com/en-us/msoffice/forum/all/select-browse-object-button-in-word-missing/5507857f-b7c7-40e5-b9d3-ae5d2532269b).
The Ctrl-G mentioned as a possible substitute in the link didn't seem to be of much use to me when I tried it; it didn't appear to select any thing. By contrast, Ctrl-G is very useful in Excel if you need to delete all of the graphics in a sheet.
2016-06-20 16:46:04
Jesse Falk
Hi there - good tip - a good addition might be to change the text to "Shift-Tab" instead of "Ctrl-Tab" when performing this same trick in Excel.
2014-11-18 06:33:28
K.Vee.Shanker.
Thanks Ken!
2014-11-15 05:31:31
Ken Endacott
Another approach is to use the browse feature. At the bottom of the vertical scroll bar click the Select Browse button and select Browse by Graphic. Then use the adjacent browse buttons or the Ctrl+PageUp or Ctrl+PageDown+keys to select the next or previous graphic. This moves the insertion point to the start of the paragraph to which the graphic is anchored. If you then select the paragraph the graphic will also be selected and you can right click on the graphic to edit it.
If the textbox and the hidden graphic are anchored to the same paragraph then both will be selected and you can chose which one to edit. Otherwise only the one anchored to that paragraph will be shown.
Got a version of Word that uses the ribbon interface (Word 2007 or later)? This site is for you! If you use an earlier version of Word, visit our WordTips site focusing on the menu interface.
Visit the WordTips channel on YouTube

FREE SERVICE: Get tips like this every week in WordTips, a free productivity newsletter. Enter your address and click "Subscribe."
Copyright © 2024 Sharon Parq Associates, Inc.
 Please Note:
This article is written for users of the following Microsoft Word versions: 2007, 2010, and 2013. If you are using an earlier version (Word 2003 or earlier), this tip may not work for you. For a version of this tip written specifically for earlier versions of Word, click here:
Please Note:
This article is written for users of the following Microsoft Word versions: 2007, 2010, and 2013. If you are using an earlier version (Word 2003 or earlier), this tip may not work for you. For a version of this tip written specifically for earlier versions of Word, click here:
Comments