Please Note: This article is written for users of the following Microsoft Word versions: 2007, 2010, 2013, 2016, 2019, and Word in Microsoft 365. If you are using an earlier version (Word 2003 or earlier), this tip may not work for you. For a version of this tip written specifically for earlier versions of Word, click here: Freezing Cell Size when Inserting Pictures.
Written by Allen Wyatt (last updated October 29, 2022)
This tip applies to Word 2007, 2010, 2013, 2016, 2019, and Word in Microsoft 365
Al wrote about a problem he was having with inserting graphics into a table. He created a table that had four rows and four columns, and then merged the center four cells. He ended up with one large cell surrounded by twelve smaller cells. When he tried to place a picture into the center cell, his table was thrown all out of whack as the table rows and columns would adjust to accommodate the inserted picture.
This is normal behavior for Word. According to Word's online help system, if you insert a graphic into a table cell, the cell is adjusted to fit the dimensional needs of the graphic. If you don't want Word to do that, then you must format the table so that it won't. This requires two passes through the Table Properties dialog box. Follow these steps:
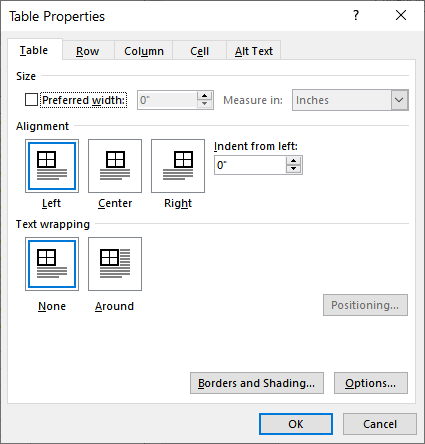
Figure 1. The Table tab of the Table Properties dialog box.
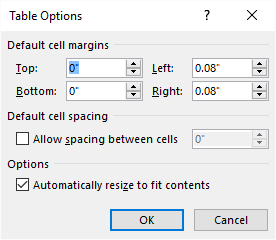
Figure 2. The Table Options dialog box.
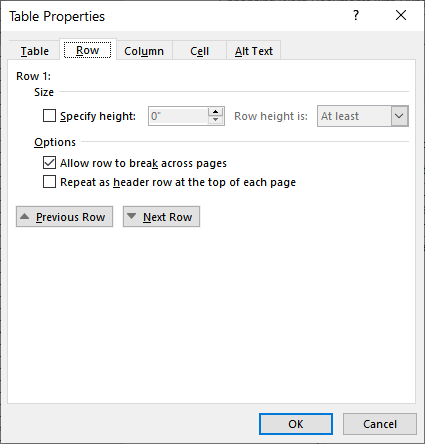
Figure 3. The Row tab of the Table Properties dialog box.
Now, insert your picture as you normally would. The table will not resize. If the graphic is larger than the available space in the cell, then it is cropped to fit within the cell.
WordTips is your source for cost-effective Microsoft Word training. (Microsoft Word is the most popular word processing software in the world.) This tip (13299) applies to Microsoft Word 2007, 2010, 2013, 2016, 2019, and Word in Microsoft 365. You can find a version of this tip for the older menu interface of Word here: Freezing Cell Size when Inserting Pictures.
The First and Last Word on Word! Bestselling For Dummies author Dan Gookin puts his usual fun and friendly candor back to work to show you how to navigate Word 2013. Spend more time working and less time trying to figure it all out! Check out Word 2013 For Dummies today!
Need to make your table a different size? It's easy to do, using the same general technique you use when resizing a ...
Discover MoreTable getting too long? Need to move part of a table to somewhere else in your document? You can easily split an existing ...
Discover MoreIf you get a document from a coworker that has tabs used to line up tabular information, you might want to change that ...
Discover MoreFREE SERVICE: Get tips like this every week in WordTips, a free productivity newsletter. Enter your address and click "Subscribe."
2022-11-02 10:20:21
Nick From London
Hi
I use a table to add photographs in engineering reports. This looks very helpful.
I have a macro that lets me change the width of a set of selected shapes and inline shapes.
(see Figure 1 below)
Nick
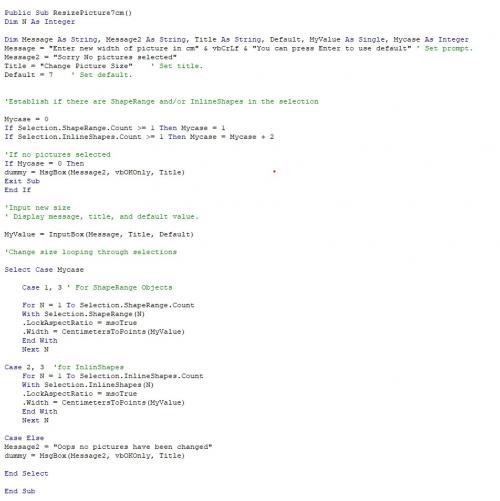
Figure 1. Macro Screen shot
Got a version of Word that uses the ribbon interface (Word 2007 or later)? This site is for you! If you use an earlier version of Word, visit our WordTips site focusing on the menu interface.
Visit the WordTips channel on YouTube

FREE SERVICE: Get tips like this every week in WordTips, a free productivity newsletter. Enter your address and click "Subscribe."
Copyright © 2024 Sharon Parq Associates, Inc.
 Please Note:
This article is written for users of the following Microsoft Word versions: 2007, 2010, 2013, 2016, 2019, and Word in Microsoft 365. If you are using an earlier version (Word 2003 or earlier), this tip may not work for you. For a version of this tip written specifically for earlier versions of Word, click here:
Please Note:
This article is written for users of the following Microsoft Word versions: 2007, 2010, 2013, 2016, 2019, and Word in Microsoft 365. If you are using an earlier version (Word 2003 or earlier), this tip may not work for you. For a version of this tip written specifically for earlier versions of Word, click here:
Comments