Please Note: This article is written for users of the following Microsoft Word versions: 2007, 2010, 2013, 2016, 2019, and Word in Microsoft 365. If you are using an earlier version (Word 2003 or earlier), this tip may not work for you. For a version of this tip written specifically for earlier versions of Word, click here: Keeping Callouts Positioned.
Written by Allen Wyatt (last updated September 20, 2023)
This tip applies to Word 2007, 2010, 2013, 2016, 2019, and Word in Microsoft 365
One of the features of the graphics capabilities in Word is that you can easily add callouts to your graphics. This simply means that you can add a special text box that allows you to explain different aspects of a figure. For instance, you might want to draw the readers' attention to a specific portion of a picture, so you provide your explanation with an arrow that points to the relative area in the picture.
If you use callouts of this type frequently, you may notice that it is possible for them to "jump around" a bit over time. This typically happens if you edit a document extensively after callouts have been placed. The reason is quite simple: as you make your edits, the pagination and layout of a page can change. This can affect exactly where your callouts are located. For instance, if you have a drawing with three callouts, you actually have four graphic elements. Not all of the elements may be "anchored" to the same location on the page. As you make edits, the anchor points shift to account for the layout changes. This affects the appearance of the callouts in relation to the drawing you want them associated with.
There are several solutions you can follow. The first (and perhaps most obvious) is to use a third-party graphics program and add your callouts within it. That way you are inserting a single graphic, with callouts in place, rather than individual graphics and callouts.
If you still want to do your work within Word, then the next best solution is to simply instruct Word to treat the drawing and associated callouts as a single unit. Remember that the callouts are actually treated as individual graphic elements by Word. Thus, you can select each callout, along with the original drawing, and group them together as a single unit. The following steps will do the trick:
Word now treats your graphic, with its associated callouts, as a single unit. If you later want to change a callout (or even remove one), you will need to select your compound graphic and ungroup it. (Click on Draw and choose Ungroup.)
WordTips is your source for cost-effective Microsoft Word training. (Microsoft Word is the most popular word processing software in the world.) This tip (6281) applies to Microsoft Word 2007, 2010, 2013, 2016, 2019, and Word in Microsoft 365. You can find a version of this tip for the older menu interface of Word here: Keeping Callouts Positioned.

Comprehensive VBA Guide Visual Basic for Applications (VBA) is the language used for writing macros in all Office programs. This complete guide shows both professionals and novices how to master VBA in order to customize the entire Office suite for their needs. Check out Mastering VBA for Office 2010 today!
Understanding how Word handles wrapping text around a graphic or other object is critical to getting the best page layout ...
Discover MoreLines can help to organize the data on a page or make certain points clearer. Word provides several different ways you ...
Discover MoreIf you are doing work with a lot of graphics, it may be helpful to create a summary page that contains thumbnail ...
Discover MoreFREE SERVICE: Get tips like this every week in WordTips, a free productivity newsletter. Enter your address and click "Subscribe."
2023-09-21 11:44:48
Connie
Several have recommended using the snip tool to create a screen shot of the image and callouts. One drawback to this is image resolution. If your document will be read on screen (vs. print) and you anticipate your readers zooming way in on the image, it will not enlarge well because it was created at screen resolution. If you use this technique, zoom in on the image to enlarge it as much as possible before snipping the screen-cap, and set your document resolution to 220 or above.
2023-09-21 09:13:41
Paul Stregevsky
Andy,
You can anchor a graphic to a fixed location on a page by selecting the graphic, selecting More Layout Options in the context menu, and then selecting the "Lock Anchor" checkbox. This option is not available if your graphic is anchored "inline." See "Understanding Anchors" at https://support.microsoft.com/en-gb/office/wrap-text-and-move-pictures-in-word-becff26a-d1b9-4b9d-80f8-7e214557ca9f . I'm sure Allen has written about it, too; search for "lock anchor" or perhaps "anchors" on this site.
2023-09-21 09:03:55
Paul Stregevsky
Kiewerry,
If you replace the graphic and callouts with a screenshot, you can no longer edit them. Better, I think, would be to group them, as Allen suggests in his article, or--best of all--to encapsulate them in a Word Drawing Canvas, as Falk suggested in his 2019 comment.
2023-09-20 04:50:21
Kiwerry
Andy:
How about taking a screenshot of your graphic with callouts, then replacing the graphic and callouts with the screenshot?
2023-06-09 18:17:30
Andy
Allen,
I found this thread while looking for a solution that Microsoft removed back in 2007. Do you know how to make Microsoft 365 apps behave as they did pre-2007 with regard to shape-callouts and anchoring their pointers?
(see Figure 1 below)
I want to be able to anchor the pointer position so that as I move the callout text box or resize it, the pointer stays where I left it rather than moving around the page either with the callout text box or moving away as I grow the width of the callout text box area.
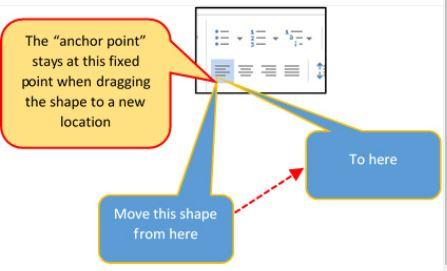
Figure 1.
2019-05-23 11:08:54
Connie
In reply to Falk - What a great solution. Thank you!
2019-05-22 14:21:16
Falk
In reply to Connie:
There is yet another way keep the graphic inline with the text while still using (and editing) callout to that graphic: Insert a new drawing area, to be found at the bottom of the autoforms dropdown menu (sorry in case the term is wrong - I use a German localization of Office)
(see Figure 1 below)
Now, you can't insert a graphic with the "in line with text" option into the drawing area - but the drawing area it self can be formatted with every type of wrapping that normal graphics can. This area can be resized to your heart's desire, as can its contents. Use all forms, images, drawings, clipart, whatever you fancy. You can arrange everything just as you want, all items inside the area will always stay aligned as you positioned them, no matter how the document around it will change. I use it in papers and documentations a lot

Figure 1.
2019-05-22 11:25:58
Connie
One additional tip (Word 2010): I have found that if the wrap mode of the graphic is "In line with text", this will not work. It won't let you select the graphic and the call-outs at the same time. If you need to use the in-line wrap mode, do the following:
1) Temporarily change the wrap mode of the graphic to any other setting, like "top and bottom"
2) Select your graphic and call-outs as described in the article.
3) Group them.
4) Now select the entire group and change the wrap mode back to "In line with text".
2019-05-21 10:33:48
Maura
I never knew about grouping images. This is SO helpful, as my colleague constantly has to rearrange items that shift in conversion.
Thank you!!
2019-05-18 16:00:45
Allan
The very simplest way to conserve a graphic with callouts is to use the Snipping Tool.
Only drawback , it cannot be changed.
Got a version of Word that uses the ribbon interface (Word 2007 or later)? This site is for you! If you use an earlier version of Word, visit our WordTips site focusing on the menu interface.
Visit the WordTips channel on YouTube

FREE SERVICE: Get tips like this every week in WordTips, a free productivity newsletter. Enter your address and click "Subscribe."
Copyright © 2024 Sharon Parq Associates, Inc.
 Please Note:
This article is written for users of the following Microsoft Word versions: 2007, 2010, 2013, 2016, 2019, and Word in Microsoft 365. If you are using an earlier version (Word 2003 or earlier), this tip may not work for you. For a version of this tip written specifically for earlier versions of Word, click here:
Please Note:
This article is written for users of the following Microsoft Word versions: 2007, 2010, 2013, 2016, 2019, and Word in Microsoft 365. If you are using an earlier version (Word 2003 or earlier), this tip may not work for you. For a version of this tip written specifically for earlier versions of Word, click here:
Comments